Brownies are one of the most beloved treats, but achieving that perfect balance of fudgy centers and crackly tops can be tricky. Even experienced bakers sometimes end up with dry, cakey squares instead of rich, chocolatey perfection. Mastering a few expert techniques can transform your homemade brownies from ordinary to extraordinary, impressing friends and family with bakery-quality results every time.
1. Room-Temperature Eggs Make Magic Happen
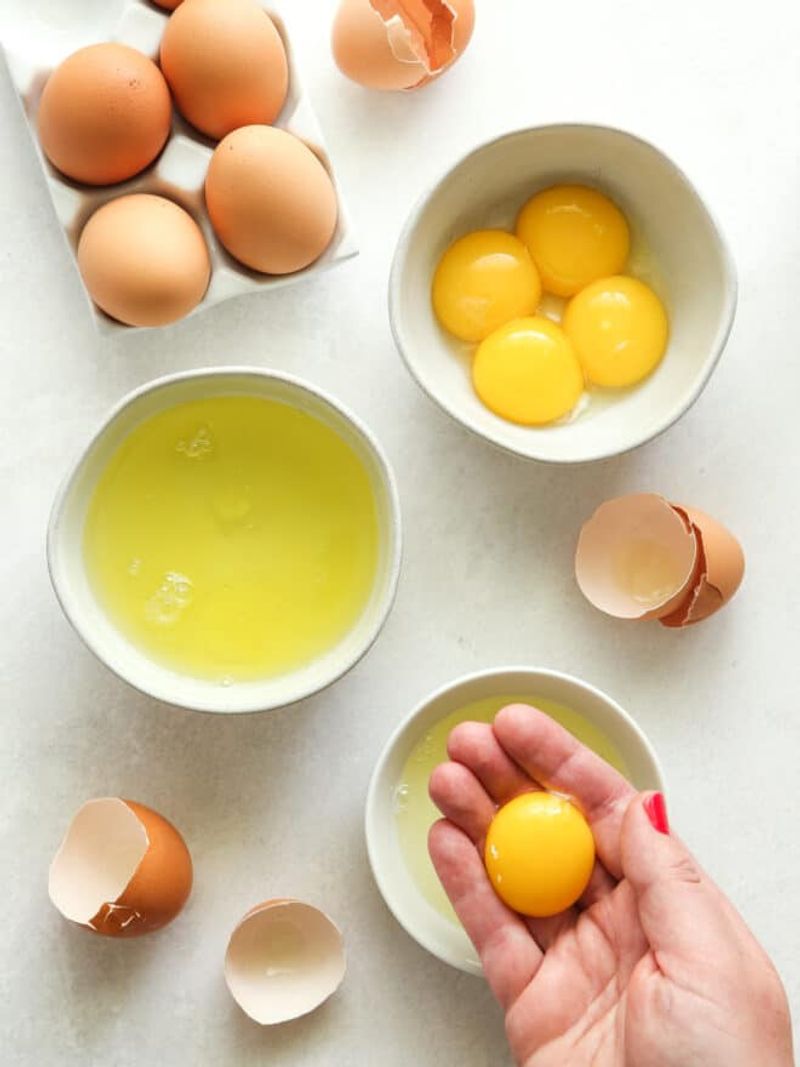
Cold eggs straight from the refrigerator can shock your brownie batter, causing it to separate and bake unevenly. Set your eggs on the counter about 30 minutes before baking to bring them to room temperature.
This simple step helps eggs incorporate more smoothly into your batter, creating a silkier texture. Room-temperature eggs also trap more air when beaten, helping give structure to your brownies without making them too cakey.
If you’re in a hurry, place cold eggs in a bowl of warm (not hot) water for 5-10 minutes. They’ll warm up quickly without cooking, ensuring your brownies turn out with that perfect fudgy texture everyone craves.
2. Gentle Mixing Prevents Tough Brownies
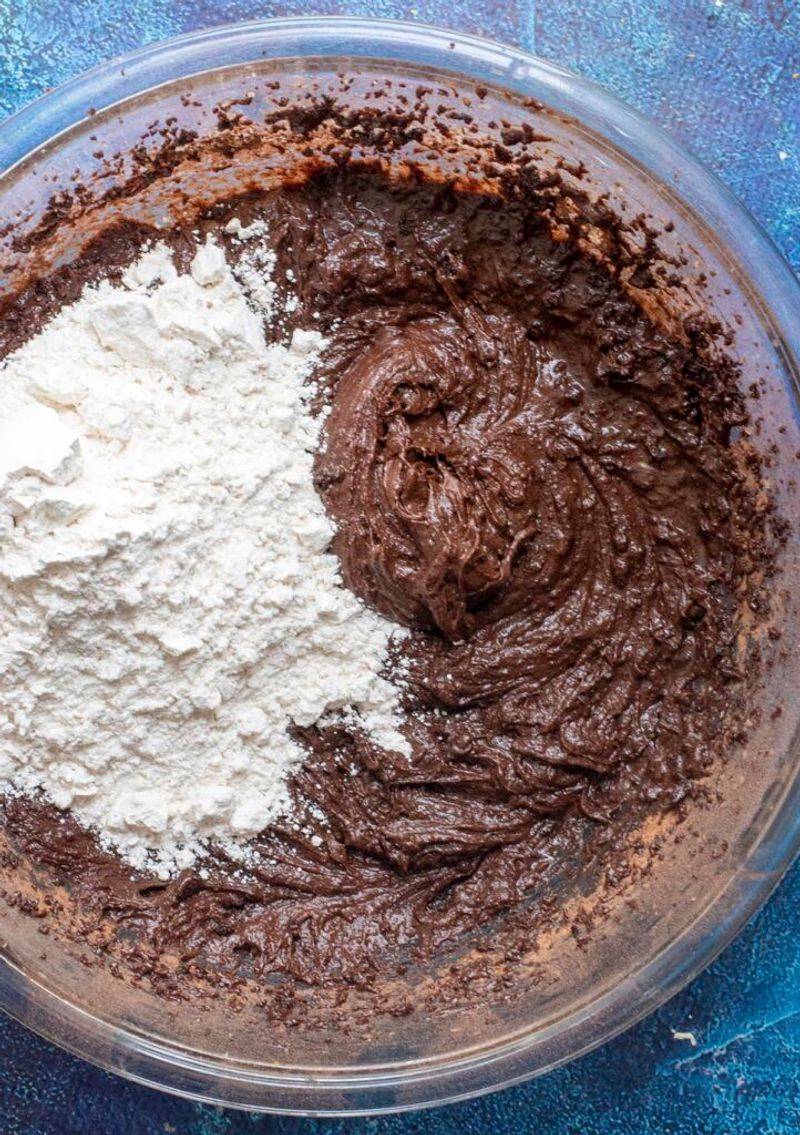
The moment flour meets your wet ingredients marks a critical turning point in brownie-making. Mix just until the last streaks of flour disappear – then put down that spoon! Excessive stirring develops gluten, the protein that gives bread its chewiness but ruins a brownie’s tender texture.
Watch for the visual cue: when you no longer see dry flour, you’re done mixing. Many bakers ruin perfect brownies in these final moments by giving ‘just a few more stirs.’ Using a rubber spatula instead of a whisk gives you better control and helps prevent overmixing.
For truly fudgy results, count your stirs after adding flour – 15-20 gentle folds is typically plenty.
3. Pan Size Matters More Than You Think

That 9×13 pan might seem like a convenient substitute when your recipe calls for an 8×8, but this swap dramatically changes how your brownies bake. Using a pan that’s too large spreads the batter thin, resulting in dry, overcooked brownies that bake much faster than expected.
Using a smaller pan creates thicker brownies that may remain undercooked in the center. Each recipe is calibrated for a specific pan size to achieve the perfect balance of crisp edges and fudgy centers. If substitution is absolutely necessary, adjust your baking time accordingly – larger pans need less time, smaller pans need more.
Metal pans also conduct heat differently than glass or ceramic, so keep a close eye on brownies when switching pan materials.
4. Parchment Paper: The Baker’s Secret Weapon
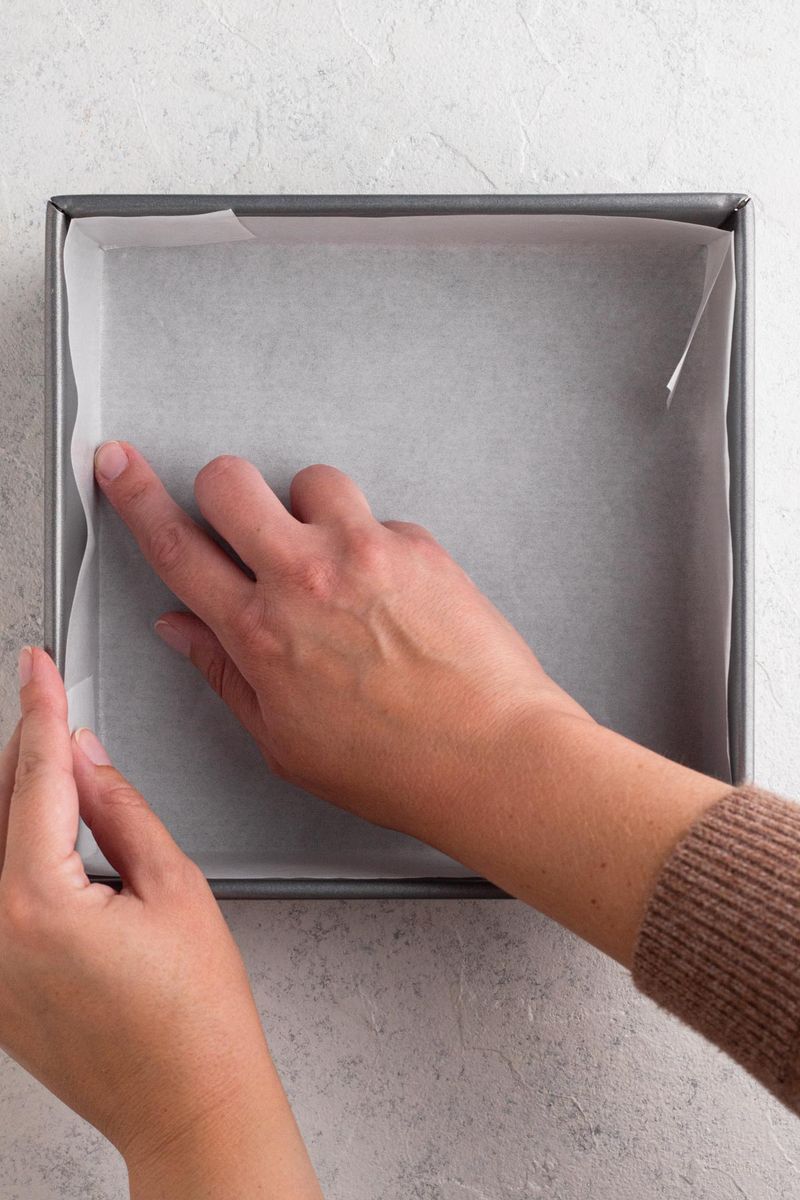
Greasing a pan might seem sufficient, but parchment paper takes brownie preparation to professional levels. Cut a piece slightly larger than your pan, creating ‘handles’ that extend up the sides for easy removal after baking.
Beyond preventing stuck brownies, parchment creates more even heat distribution during baking. This results in consistent texture throughout your batch, eliminating those overdone corners that plague many home bakers. The real magic happens after baking – lifting the entire slab out intact allows proper cooling before cutting.
This simple step prevents the dreaded crumbling that happens when cutting warm brownies directly in the pan. For picture-perfect squares, chill parchment-lined brownies in the refrigerator for 30 minutes before cutting with a warm knife.
5. Premium Chocolate Transforms Ordinary Brownies
The chocolate you choose forms the foundation of your brownies’ flavor profile. Bargain brands often contain less cocoa butter and more fillers, resulting in flat-tasting treats lacking that rich chocolate depth. For cocoa powder, look for Dutch-processed varieties for smoother flavor without acidic notes.
When recipes call for baking chocolate, choose bars specifically labeled for baking – chocolate chips contain stabilizers that affect how they melt and incorporate. Many professional bakers recommend combining different chocolate percentages for complex flavor.
Try mixing 70% dark with a touch of milk chocolate for brownies with sophisticated taste that still appeals to everyone. The small price difference for premium chocolate yields dramatically better results that even casual tasters immediately notice.
6. A Pinch of Salt Creates Flavor Magic
Salt might seem counterintuitive in sweet treats, but this humble ingredient performs culinary alchemy in brownies. Rather than making brownies taste salty, it enhances the chocolate flavor by suppressing bitterness and highlighting sweetness.
Professional bakers often use kosher or sea salt rather than table salt for better flavor distribution. Adding a light sprinkle of flaky sea salt on top just before baking creates an irresistible sweet-savory contrast that makes chocolate flavors pop. The science behind this trick involves salt’s ability to amplify flavor perception on your taste buds.
Without adequate salt, even the most expensive chocolate can taste flat and one-dimensional. For truly remarkable brownies, never skip this crucial ingredient – it’s the difference between good and extraordinary.
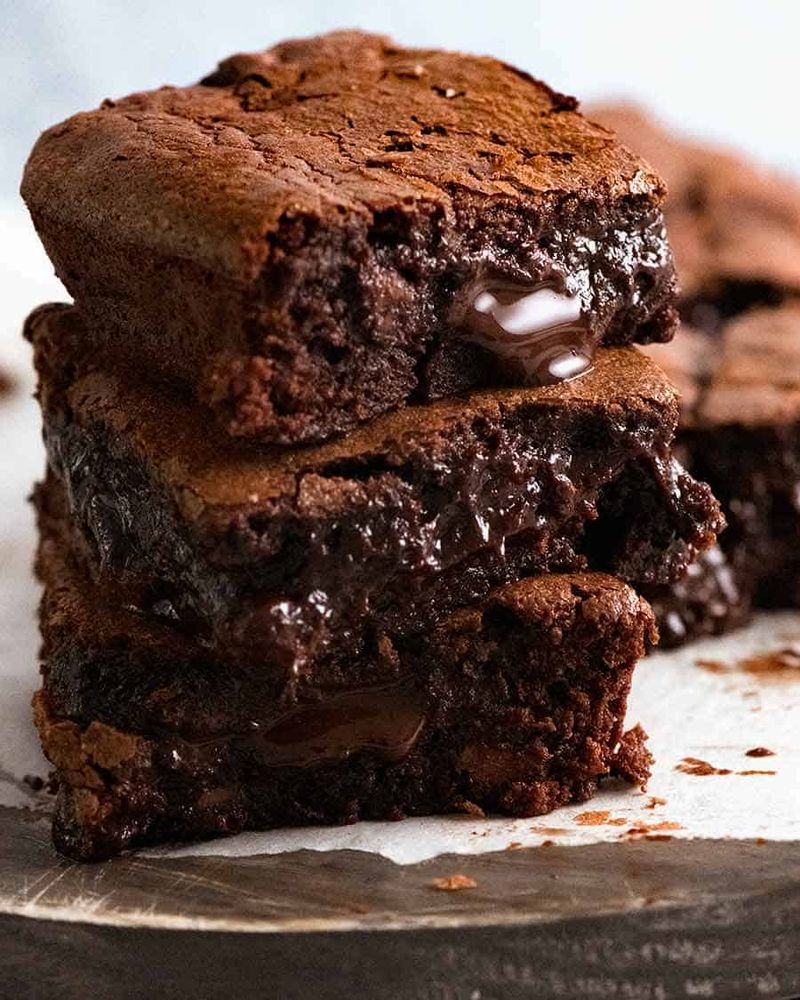
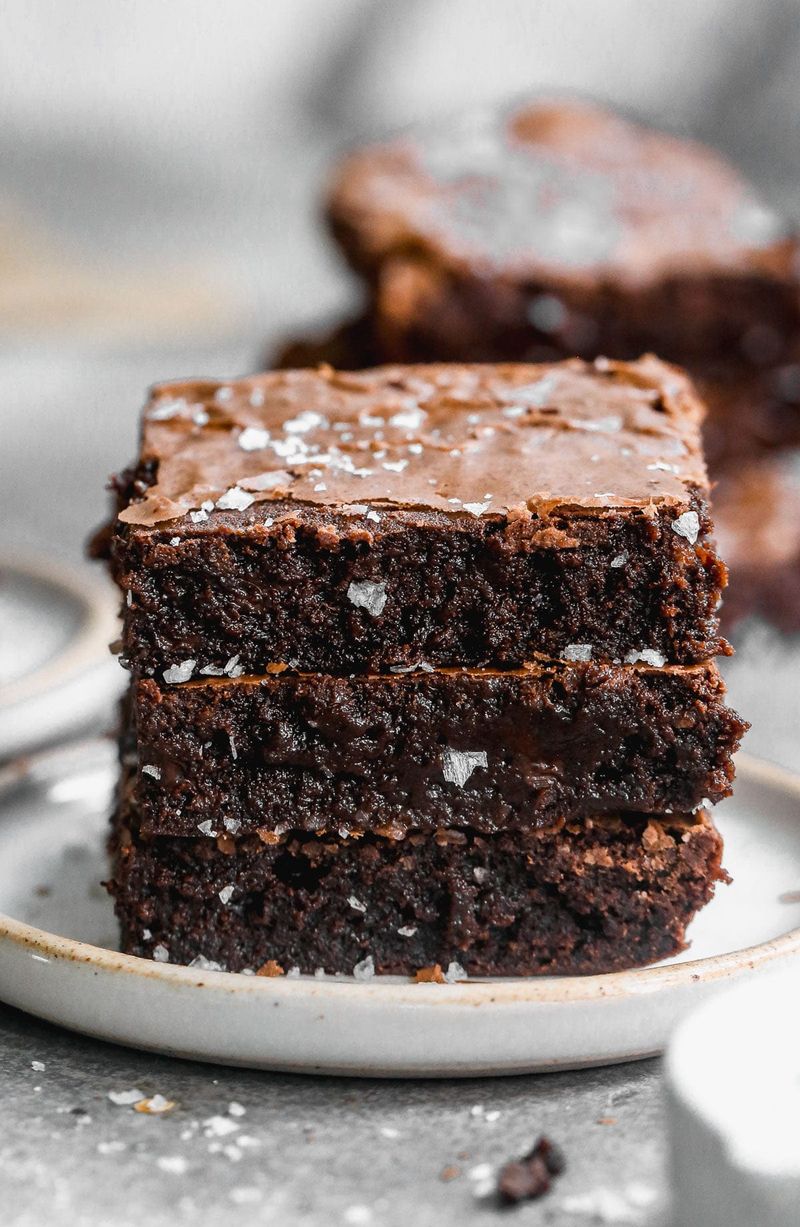
7. Master the Toothpick Test for Perfect Doneness

Forget everything you learned about cake testing – brownie doneness follows different rules entirely. The classic ‘clean toothpick’ method that works for cakes will leave you with dry, overcooked brownies every time.
Insert a toothpick into the center of your brownies about 2 inches from the edge. The perfect brownie toothpick should emerge with a few moist crumbs clinging to it – not wet batter, but not completely clean either. These moist crumbs indicate that carryover cooking will finish the job as brownies cool. Start checking about 5 minutes before the recipe’s suggested baking time.
Remember that glass pans retain heat longer than metal, so brownies continue cooking even after removal from the oven. This precise testing method guarantees that perfect fudgy middle that defines exceptional brownies.
8. Patience Pays Off: The Cooling Conundrum

The hardest part of brownie-making isn’t the mixing or baking – it’s waiting. Fresh-from-the-oven brownies contain unstable starches and melted fats that need time to set. Cutting too soon destroys their structure, resulting in messy, gooey pieces instead of clean squares.
Allow brownies to cool completely in their pan on a wire rack for at least one hour. For even cleaner cuts, professional bakers recommend refrigerating brownies for 30 minutes after they reach room temperature. This cooling period isn’t just about appearance – it fundamentally changes texture and flavor.
The fudgy quality develops during cooling as ingredients settle and meld together. When you finally cut into properly cooled brownies, you’ll be rewarded with picture-perfect squares and that signature chewy-fudgy texture that makes brownies irresistible.
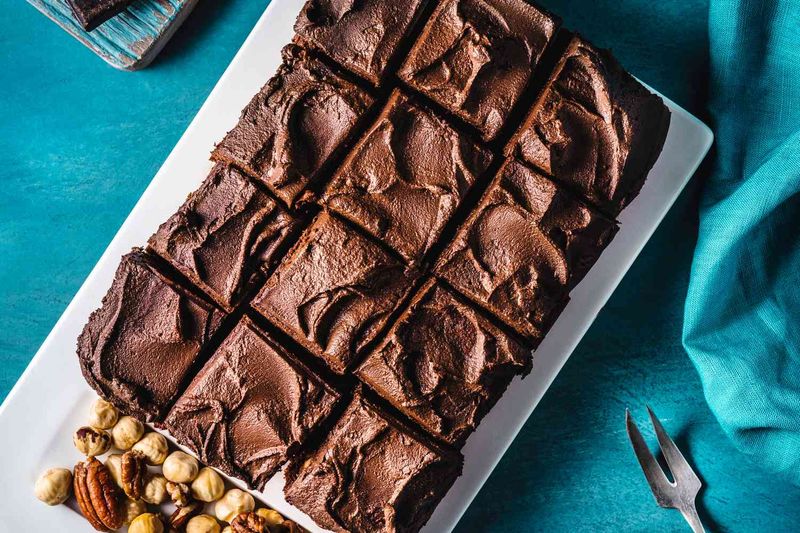
9. Strategic Add-ins Elevate Your Brownie Game
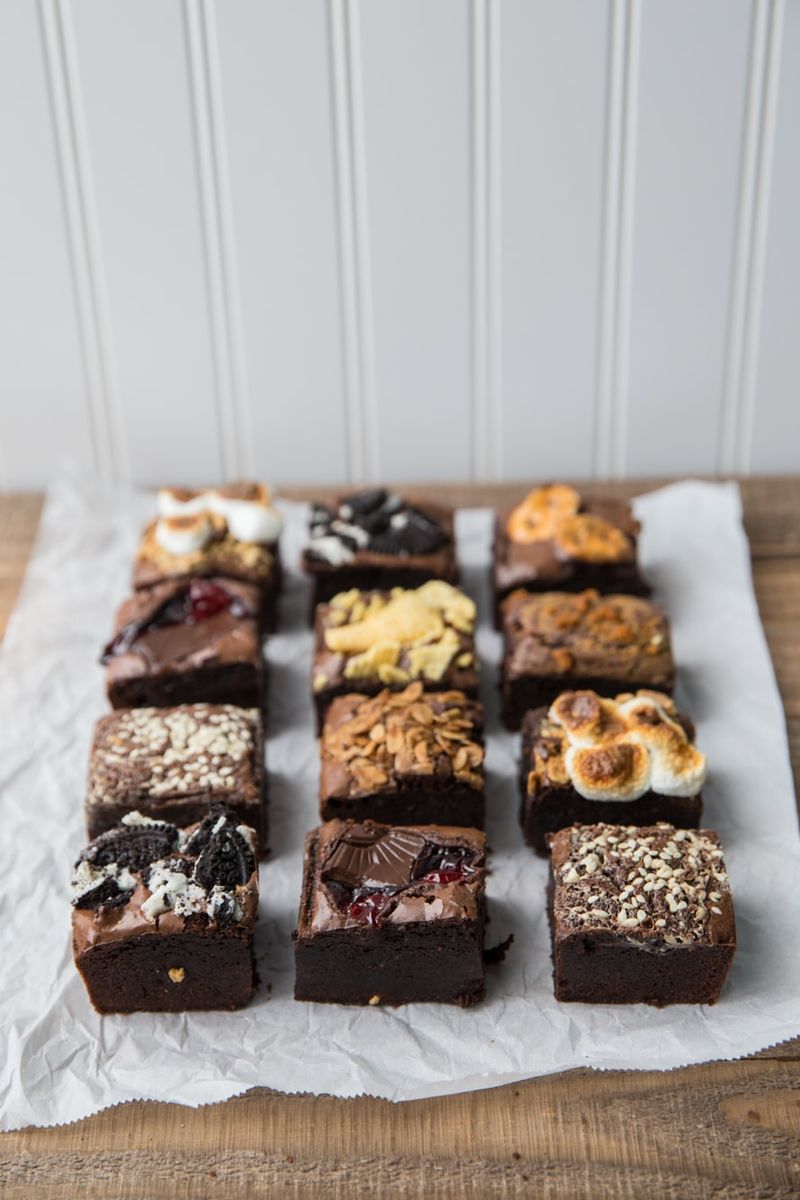
Mix-ins can transform basic brownies into spectacular creations, but moderation is key. Too many additions disrupt the delicate moisture balance and structure of your brownies. Professional bakers recommend limiting add-ins to about 1 cup total per 8×8 pan.
Certain ingredients require special handling: nuts toast better separately before adding, preventing bitterness. Chocolate chips should be tossed in flour before folding in to prevent sinking. For swirls like caramel or peanut butter, slightly freezing them first helps maintain distinct ribbons throughout. Consider texture contrasts when selecting add-ins – crunchy nuts balance fudgy centers beautifully.
Unexpected ingredients like tahini, espresso powder, or orange zest add sophistication without overwhelming. Remember that less is often more – one perfectly executed addition creates more impact than multiple competing flavors.
10. Smart Storage Extends Brownie Freshness
After investing time creating perfect brownies, proper storage preserves their quality. At room temperature, brownies stay fresh 3-4 days when stored in an airtight container with parchment paper between layers to prevent sticking.
Refrigeration extends freshness to a week but can alter texture, making brownies slightly denser. For optimal results, bring refrigerated brownies to room temperature before serving. The freezer is your secret weapon for longer storage – properly wrapped brownies maintain quality for up to three months. For freezing, cut brownies into individual portions, wrap each tightly in plastic wrap, then place in freezer bags with air removed.
This method allows you to thaw only what you need. Microwave frozen brownies for 15-20 seconds for that just-baked taste, or thaw at room temperature for an hour for the perfect texture.
Leave a comment